Useful Fly Fishing Knots |
|
Tippet to Fly
Joining tippet material
Joining tippet material
Fly line to backing
Fly Line to Leader
Fly Line to Leader |
Indicator to leader / tippetttt
|
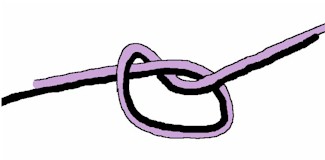
The Clinch Knot
Standard knot for attaching tippet to your fly.
 Pass the tippet through the hook eye then wind 5 times around the tippet them back through loop at the eye. Moisten by touching to your tongue and tighten by pulling up firmly. This knot sometimes breaks on tightening, it depends on the brand of tippet, adding an extra wind or two usually solves the problem Pass the tippet through the hook eye then wind 5 times around the tippet them back through loop at the eye. Moisten by touching to your tongue and tighten by pulling up firmly. This knot sometimes breaks on tightening, it depends on the brand of tippet, adding an extra wind or two usually solves the problem
|
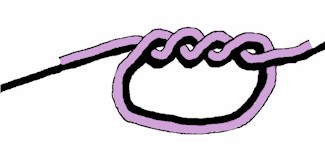
The Blood Knot
This is an excellent knot for joining to bits of tippet and nylon generally
 Step 1 Step 1
Hold your two bits of tippet cross each other gripping at A. Insure you have enough overlapping to tie the knot
|
 Step 2 Step 2
Wind one end around the other line 5 times, then bring back through and clasp at A where the loop will form.
Step 3
Wind the other end 5 times around the other line then back through the loop at A. Touch with your tongue to lubricate then pull up gently holding each end (B & C) before pulling tight. Clip off tabs, or leave one long to create a dropper
|
The Surgeons Knot.
 A simple and very effective knot to join two pieces of tippet material together. And you can create a dropper by simply leaving one of the tabs at the desired length A simple and very effective knot to join two pieces of tippet material together. And you can create a dropper by simply leaving one of the tabs at the desired length |
 Step 1 Step 1
Create a simple knot with your 2 piece of tippet to be joined |
 Step 2 Step 2
Thread one end through again then holding the ends firmly, moisten the knot with your tongue and pull tight. Trim tags.
If you want a dropper, simply leave one tag at the desired length.
|
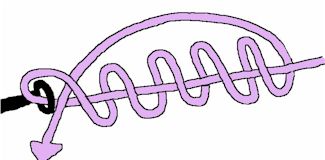
Albright knot
This is a good knot for joining your fly line to the backing.
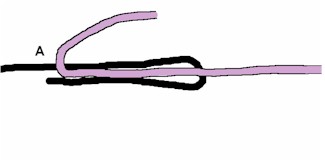 Step 1 Step 1
Create a loop (black line) in the end of your fly line. Thread your backing up the centre as shown and hold with thumb and fore finger at: A. |
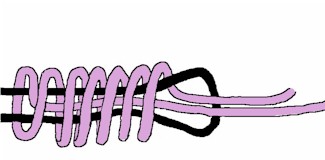 Step 2 Step 2
Wind the end back towards the loop 10 - 15 times depending on the size of knot you want then insert back through the loop.
Holding both ends of the backing (purple) pull up tight. You can work the knot up tight by using your thumb nail to work the line along into a neat knot. As an extra precaution you can tie the left over tab around the backing to make sure it doesn't slip out and the knot loosen.
Using some Aquaseal, a tough flexible wader repair material, over the whole knot is also a good idea
|
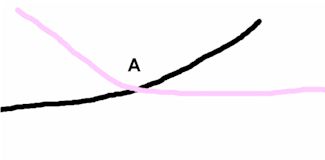
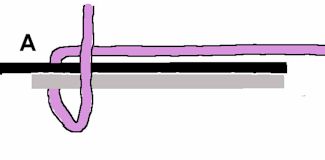
Nail-less nail knot
Joins your leader to your fly line.
 Step 1 Step 1
Hold your fly line (black) and create a loop as shown with your leader. Hold at point: A |
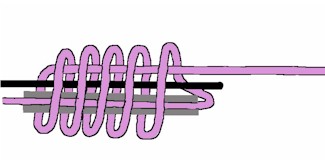
 Step 2 Step 2
Thread the leader up and through the loop about 5 times.
Step 3
And this is the tricky part, hold both ends of your leader as you gently pull the knot up tight. It's easy to let the knot slip off the end of your line at this point. Pull up very tight and then test the knot to see that it doesn't pull off the end of the fly line. Trim the knot ends close so they don't catch in your rod guides.
Using some Aquaseal, a tough flexible wader repair material, over the whole knot is also a good idea
|
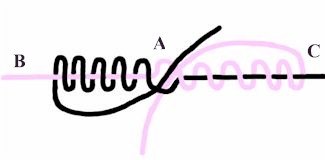
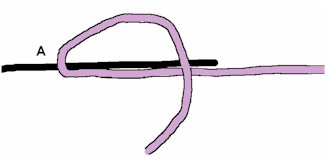
The Nail or Tube Knot.
This knot is neater than the above knot and is used to attach your leader to your fly line.
 Step 1 Step 1
Grip your Fly line (black) and the Nail/tube together. Create a loop with your leader and hold at: A as shown |
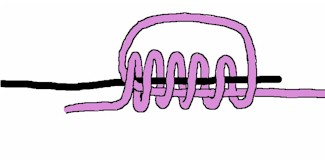
 Step 2 Step 2
Continue to wind the leader back around the Fly line about 5 times then thread it up through the tube, or along the nail. You can tie it without either though it's a bit fiddly
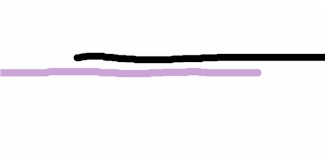
Remove the tube and pull tight holding both ends of the leader. Care needs to be taken not to pull it off the fly line. Pull very tight then give it a good test to see that it doesn't slip. Trim the knot very close so it doesn't catch on rod guides.
Using some Aquaseal, a tough flexible wader repair material, over the whole knot is also a good idea.

The end result should look like this
|