|
|
New Zealand Trout Flies
|
|
Glo Bugs
 |
|
|
|
|
Fly Tying Details; |
|
|
Name: |
Glo Bugs |
|
|
Sizes: |
10 - 16 |
|
|
Hook: |
Kamasan B110 or Tiemco 2457 |
|
|
Thread: |
Danville Fly Master 210
Denier colour to match Glo Bug's colour
or Kevlar thread |
|
|
Body: |
Egg Yarn or
Mc
Fly Foam
NB Mc Fly Foam is an easier
material to work with, it's very stretchy so is good to start with.
However I believe the fish like the Egg Yarn better but I find it's
harder to get consistently good tying results with it.....need more
practice.... |
|
|
Comment: |
Extremely popular for fishing fresh run rainbows on
the likes of the Tongariro River. Usually fished in tandem with a
heavy weighted nymph to sink the Glow Bug down to the fish's depth.
They can be deadly.... |
|
|
|
|
|
Step by Step Tying Instructions: Glo Bugs |
|
There are several methods for tying Glo Bugs, this is a quick and easy
one.
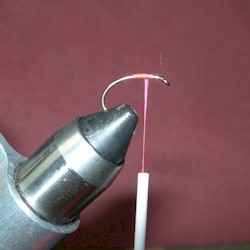
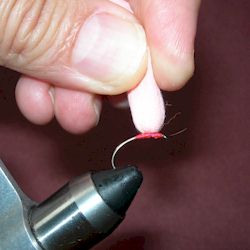
First apply glue to the hook then wrap the hook shank with tying thread,
you don't want to go to far down the hook otherwise the thread will show,
wind it back over itself finishing with the thread in the centre where you
want the centre of your bug.
The position is important, I like to tie them with lot of hook showing so
tie them forward on the hook shank |
|
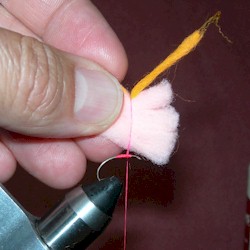 Next we add
the yarn. Select the base colour and then a thin strand of yarn for the
dot on top. Use enough yarn, about 3 strands of the egg yarn, too little and the fly won't fill right around the hook, a
little experimenting here and you'll soon work out how much. Next we add
the yarn. Select the base colour and then a thin strand of yarn for the
dot on top. Use enough yarn, about 3 strands of the egg yarn, too little and the fly won't fill right around the hook, a
little experimenting here and you'll soon work out how much.
Lay a thin strip of coloured yarn on the top (this is the dot) and hold
above the hook.
Take the tying thread up over the top of the yarn twice, making sure you lay
the second layer right on top of the first then pull down and tighten
very firmly.
Care needs to be taken to keep the yarn from spinning around the hook when
you tighten it up. |
|
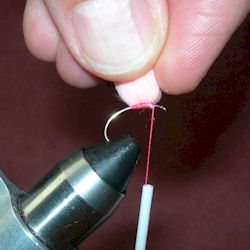
Once tightened, pull up on the
egg yarn and wind the thread very tightly twice around the base of the yarn then whip
finish behind the hook eye and trim. Apply glue to all the thread to hold
everything in place, - but careful not too much as you'll end up with hard
lumps in the finished bug. |
|
Next is to pull up on the egg yarn firmly. Then with a very sharp quality
pair of scissors or a razor blade, cut straight across the yarn below your fingers in one
clean cut. (This is where the size of the finished Glo Bug is determined.
Again experiment to achieve the desired size) |
|
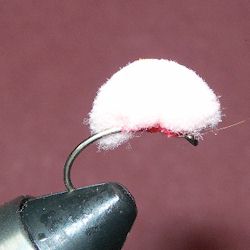
And this is the result - a nice
curved cut, you then work the yarn down around the bottom of the hook with
your fingers or the points of your scissors |
|
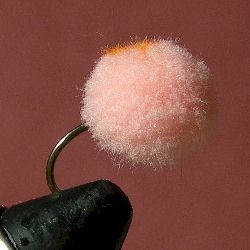
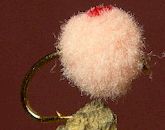
And the finished bug after
adjusting the camera, if all goes right it won't need any extra trimming and
will be nice and symmetrical like this!
It's easy to add multiple colours; or a dot within a larger dot just
by mixing your colours
|